Roborock dock repair: side clips and a €20 pump
My Roborock dock stopped dispensing water. Releasing the side clips without removing the bottom plate let me reach the pump and make a €20 repair.
Most of my recent posts have been about software and architectural debt. This time, the thing refusing to work was on the floor: our Roborock dock had stopped dispensing water to wash the mops.
I'm a DIY tinkerer. Replacing an entire dock because one part had failed felt wasteful, especially with a replacement costing around €300 or more. I wanted to find out what had stopped working before giving up on it.
The repair ended up needing a pump costing about €20. Getting through the plastic housing was the part worth documenting.
The casing made a small repair look like a big one
I spent about ten minutes trying to pull the cover open: enough force to make progress, I hoped, but not so much that I would snap the plastic. It wasn't coming out. The information I found online didn't give me a clear view of what was holding it shut.
The rear cover is one piece that wraps around partway along both sides, not a set of separate panels. I didn't know how it locked into place. To find out, I opened the bottom panel so I could see the clips from inside.
The bottom cover had a sensor attached, so I had to make sure I didn't tear its wiring as I opened it. A released cover isn't necessarily disconnected. On any device, whether you're opening a rear or bottom cover, ease it open only enough to inspect the gap first. Look for wires, sensors or other attachments before pulling it farther away.
That was the breakthrough: the side clips needed to be pushed inward to unlock. Pulling on the cover alone wasn't releasing them. Once I could see the locks and knew where to press, the rest was easy.
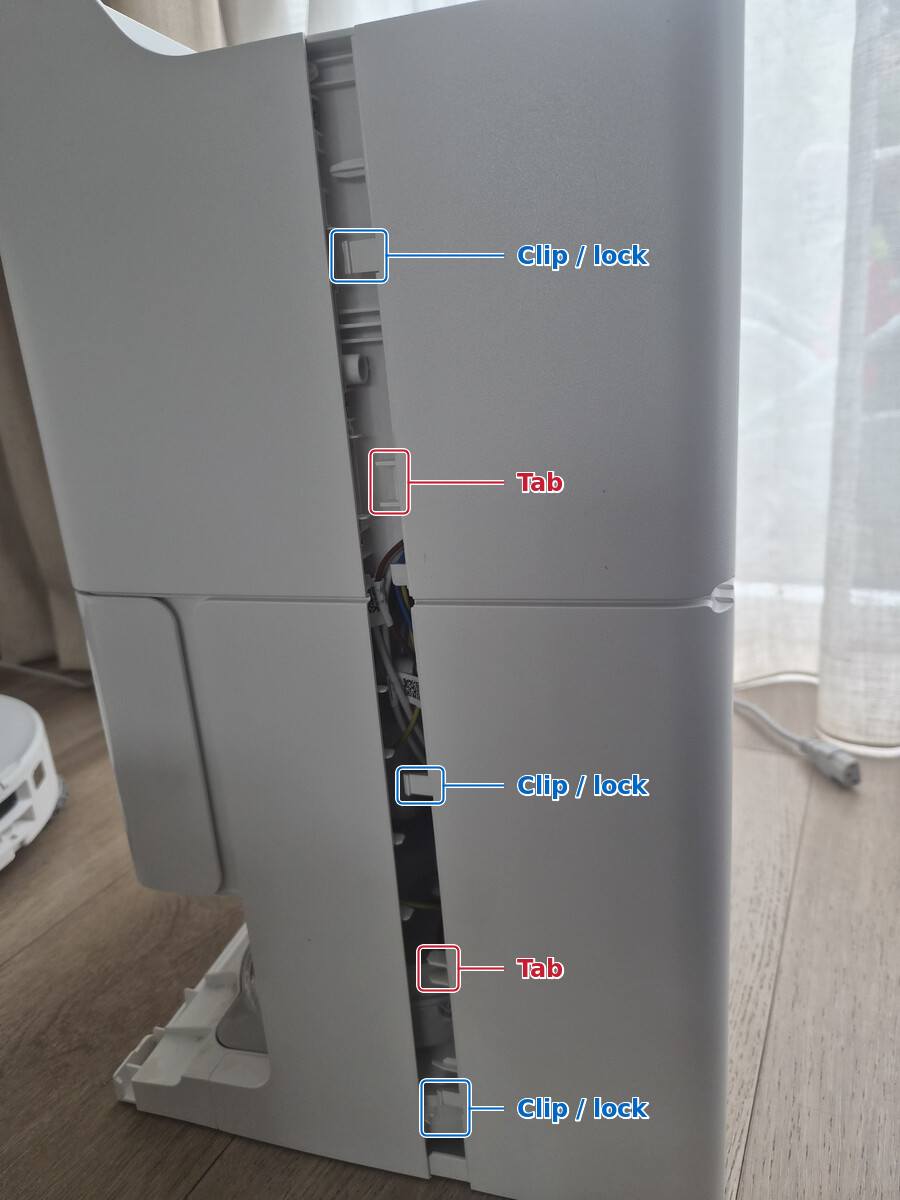
The view I was missing: tabs in red, clips/locks in blue. The side locks need to be pushed inward to release the single-piece rear cover.
I opened the bottom panel to discover the mechanism. With the clip locations known, you can release them from the side without repeating that exploratory disassembly. That's why I took this picture, and why this post exists.
The missing information wasn't how hard to pull. It was what was locked, and where to push to unlock it.
Release the latch, don't stretch the shell
Before opening anything, power down the dock, unplug it from the wall, remove the robot and water tanks, and drain any accessible water. Keep the work area dry. An unplugged appliance can still contain charged components; do not touch exposed circuitry or attempt live testing. If you cannot safely access the casing without approaching electrical parts, stop and use a repair service.
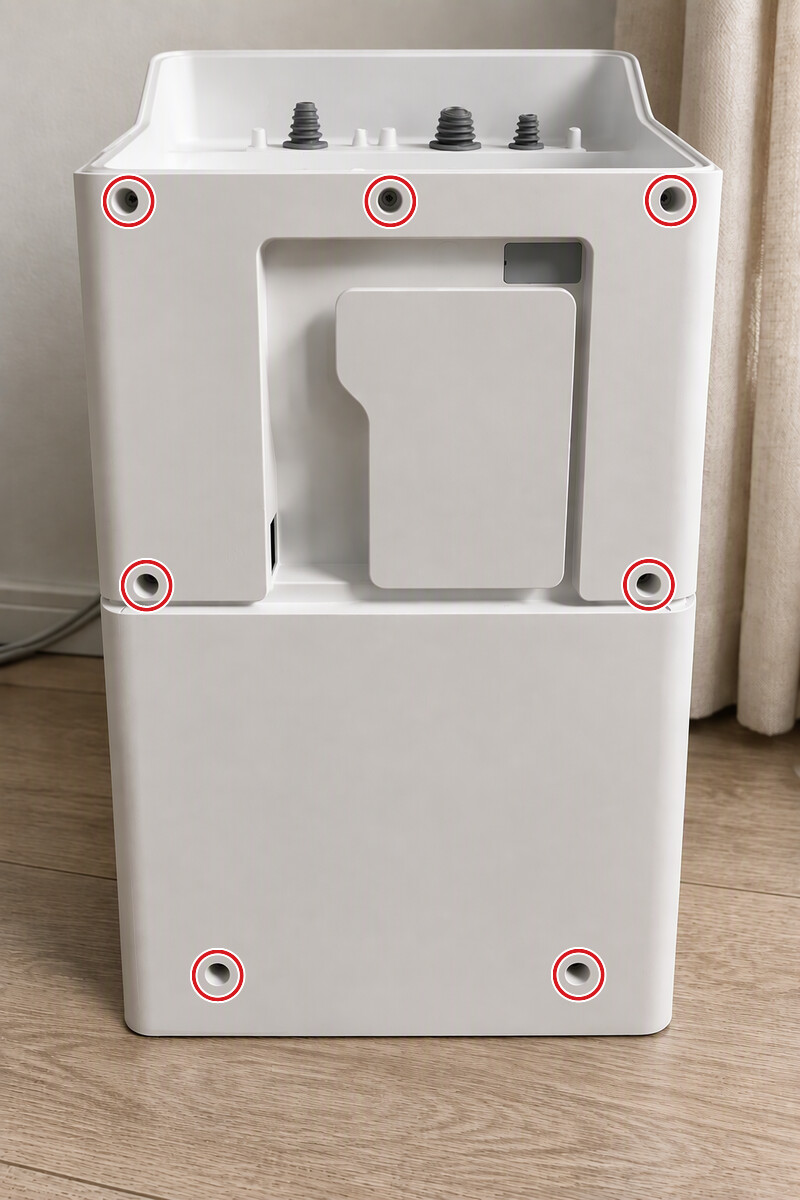
After prep, remove the rear casing screws before pulling the cover away at the top. The seven positions are circled in red. This is an AI-generated reconstruction based on reference images, not a photograph of this repair; check the positions against your actual dock.
Check the exact model label and its service information first: screw locations, clips and water systems can differ between models.
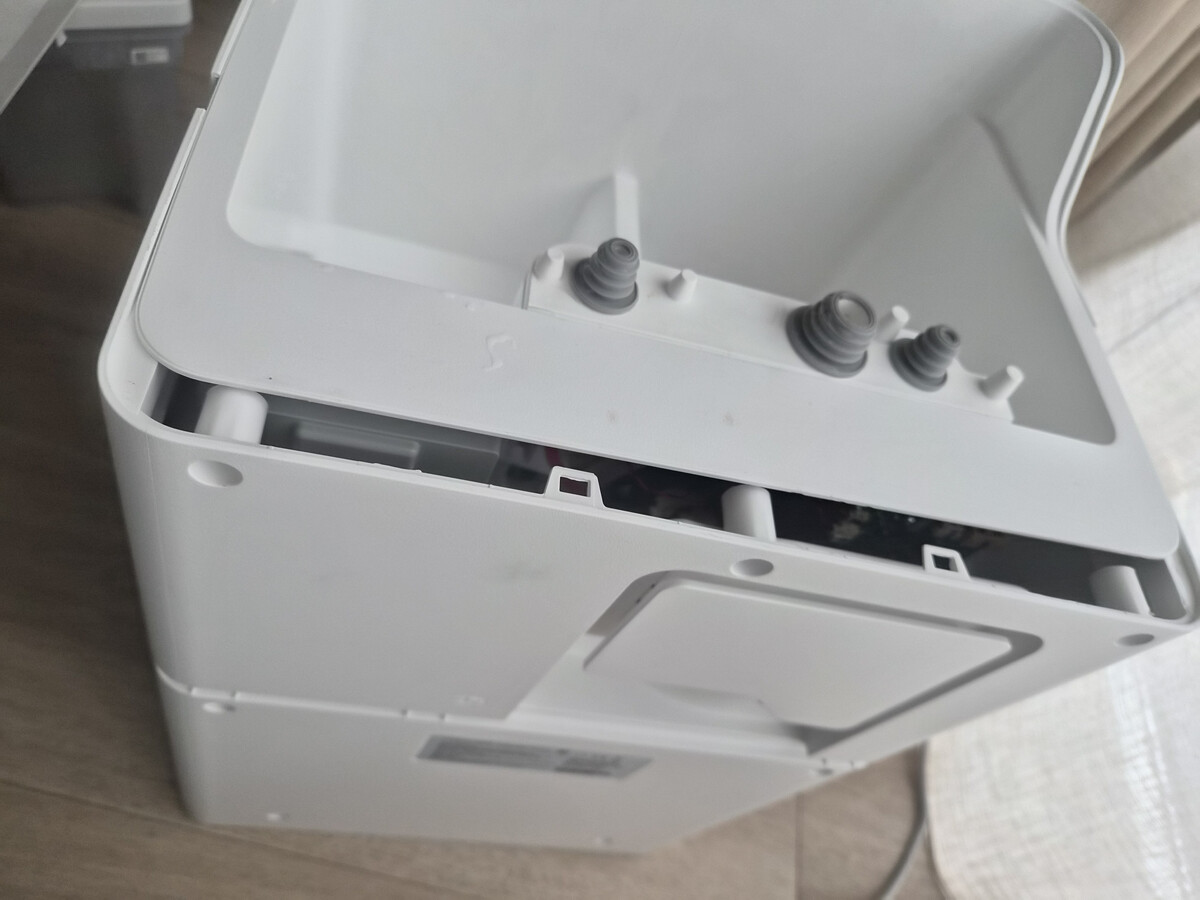
Start by pulling the cover away at the top, as shown here. The sides are part of the same piece, but their locks need to be pushed inward before you ease the cover away.
Knowing what I learned by opening the bottom, this is the sequence to use without that extra exploratory step:
- Remove the rear casing screws after prep. Use the marked rear view above to locate the seven positions, checking them against your actual dock and its model-specific service information. Keep the screws for reassembly; do not pull the casing while it is still fastened.
- Ease the cover away at the top and inspect the gap. Start at the upper edge shown above, opening only enough to look behind it for attached wiring or sensors. Support the cover and do not pull against anything connected to it. You are releasing the top of the wraparound rear cover, not removing a separate top panel. Do not expect the side locks to release by pulling alone.
- Push in the clips to unlock one side. Use the annotated photo to locate the side locks. With a suitable plastic trim tool, press each accessible clip inward while gently easing the cover away so it does not relatch. Keep the tool shallow: wiring and hoses are behind the casing. If it stays locked, reassess the contact point rather than pulling harder.
- Unlock the other side and inspect before pulling the cover back. Repeat the clip-release process on the other side, supporting the single-piece shell as it comes free. Check behind the released cover before pulling it back and away from the dock, not upward. If wiring, a sensor or a hose is attached, keep the cover supported and follow the model's service instructions before disconnecting anything. Never pull the cover clear against an attached cable or hose.
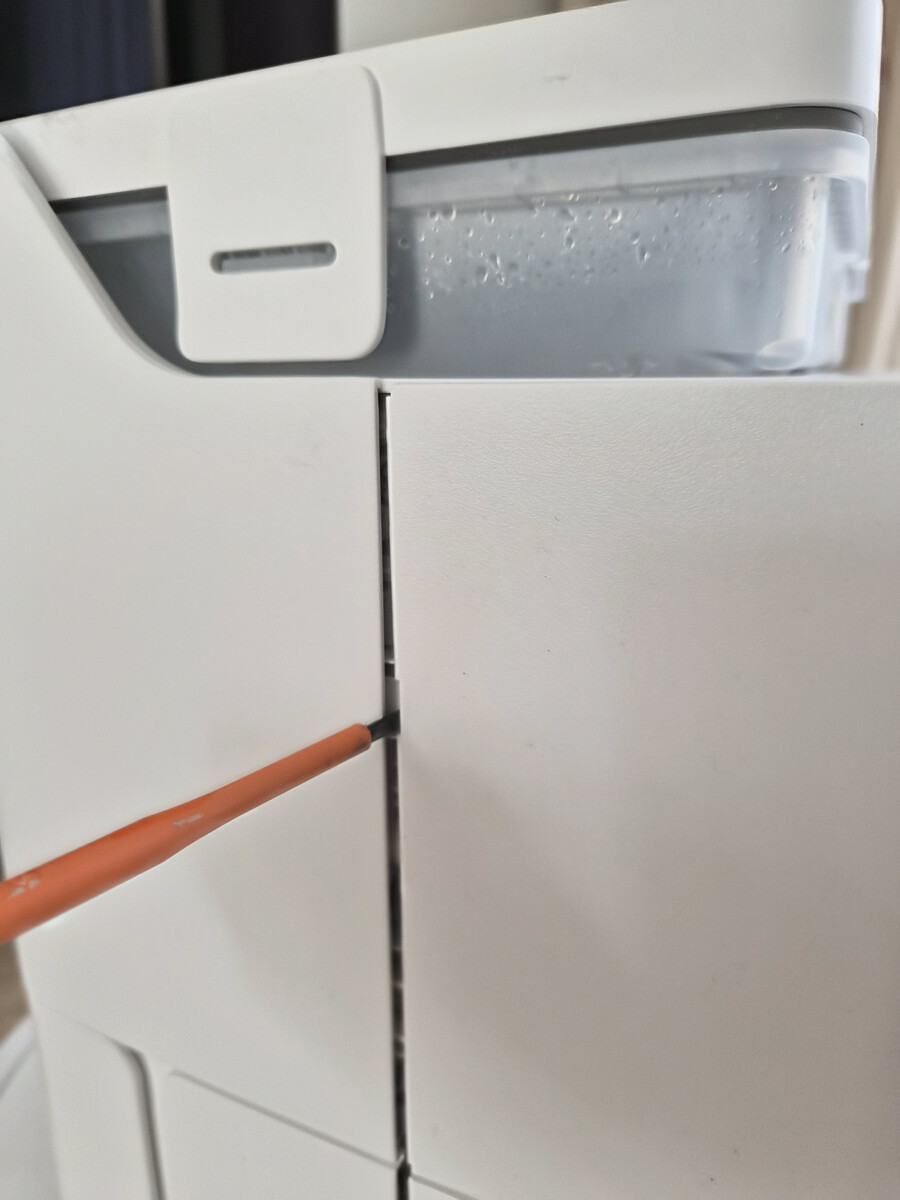
A tool-contact photo from disassembly. Push the side locks inward to release them, rather than twisting the seam apart. Use a plastic trim tool and do not drive it deep into the dock.
Opening the bottom panel helped me find the locks; it isn't necessary merely to release them once you know their positions. That does not mean every fastener or every later repair step can be skipped. The shorter route is rear screws out, cover away at the top, then push in the side clips to unlock one side and the other.
Inside: a pump, not a whole new dock
The pump assembly is near the middle: its motor is inside the black vibration damper directly above the white peristaltic head. Two red hoses connect to the head: an inlet coming from above and an outlet running to the valve.
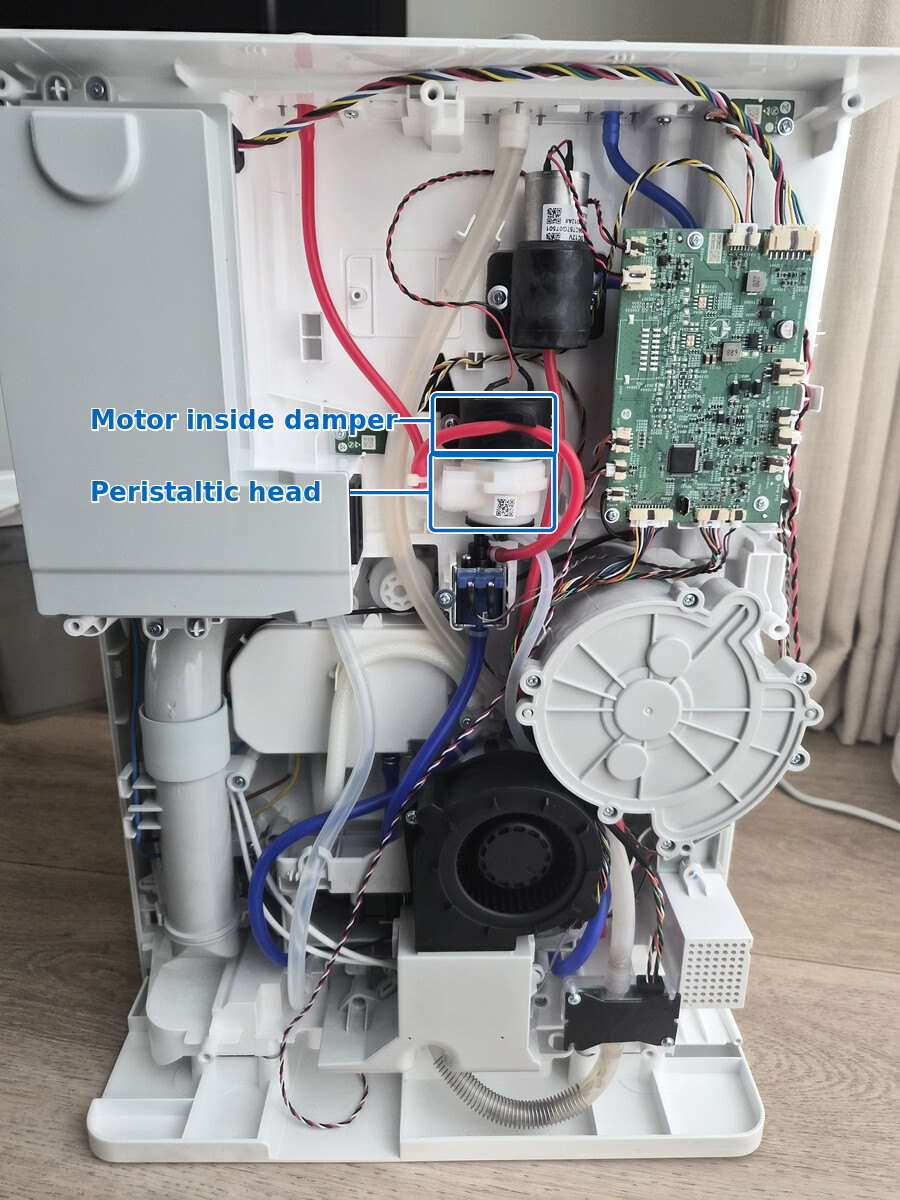
The highlighted pump assembly. The white peristaltic head sits below the motor; its two red hoses carry water in and out.
I ran a wash cycle to observe the fault. An open dock exposes mains-powered parts: do not reach inside during a powered cycle, and disconnect power before touching hoses or opening the pump.
I narrowed it down with two checks:
- Check the downstream path. I disconnected the pump's outlet hose and used a syringe to push water along that hose toward the valve. Water came out of the mop-wash nozzle. That showed the path through the valve to that nozzle was open during the test.
- Check whether the pump can move water mechanically. I opened the white peristaltic head and turned its mechanism by hand. It pumped water.
Water passed through the downstream path, and the pump moved it when turned by hand, but it wasn't delivering during the wash cycle. The motor could have been too weak, or an upstream power or control fault could have prevented it from turning on. I didn't have a stable 12 V supply to test the motor in isolation. With the replacement costing about €20, I decided to try it before tracing the fault upstream.
Replacing the pump cost about €20. After reconnecting the hoses and wiring and refitting the enclosure, the dock resumed its normal mop-washing and wetting cycles.
The €20 part was only half the lesson
Against a roughly €300 replacement dock, the €20 part saved about €280 before delivery, tools and my time.
But the part I wanted to leave a record of was the casing. I spent ten minutes pulling against locks I couldn't see, then opened the bottom panel to find out how they worked. Pushing the clips inward unlocked the wraparound cover. The annotated photo is the information I wish I'd had before starting: it lets the next person find the locks without opening the bottom merely to discover them.
The dock is back washing mops. One replacement pump, and one less reason to throw away the rest of the machine.
When an appliance fails, where do you draw the line between opening it yourself, paying for diagnosis and replacing it? Has access to parts, safe service information or a previous failed repair changed that decision for you?